Express.js Interview Questions
1. What’s Express.js in simple words?
Explanation: Express.js is like a helper for Node.js that makes building web apps or APIs super easy. It’s a framework that handles routing (directing users to the right page) and middleware (functions that process requests). It’s like a fast-food counter—quick, flexible, and gets the job done!
Code Example (if asked):
const express = require('express'); // Import Express framework
const app = express(); // Create an Express application instance
app.get('/', (req, res) => res.send('Hey, welcome!')); // Define a GET route for the root URL, sends a response
app.listen(3000, () => console.log('Server’s up at port 3000!')); // Start server on port 3000, log when ready
How to Explain Code: The code sets up a basic server. `require('express')` loads the framework, `express()` creates the app, `app.get()` handles requests to the root URL, and `app.listen()` starts the server on port 3000, enabling it to accept HTTP requests.
Pro Tip: Mention Express is lightweight and flexible, unlike raw Node.js, which is like cooking from scratch—Express saves time!
2. How do you install Express.js?
Explanation: You add Express to your project using npm, like downloading an app. It’s stored in your project’s folder for consistency.
Code Example (if asked):
npm init -y  # Initialize a new Node.js project with default package.json
npm install express  # Install Express framework to the project
How to Explain Code: `npm init -y` creates a `package.json` file to manage dependencies. `npm install express` adds Express to the project, saving it in `node_modules` and `package.json`.
Pro Tip: Use a specific version (e.g., `npm install express@4.18.2`) for production stability, like locking a recipe.
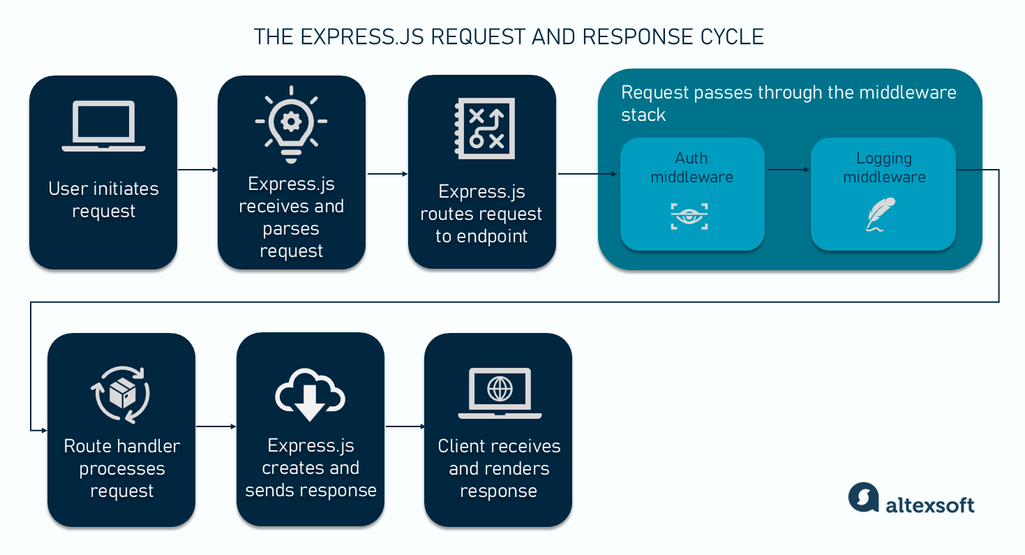
3. How do you set up a basic Express server?
Explanation: It’s like starting a food truck. Create an Express app, define routes, and listen on a port. Here’s a diagram of the HTTP request-response cycle:
Code Example (if asked):
const express = require('express'); // Import Express framework
const app = express(); // Create an Express application instance
app.get('/', (req, res) => res.send('Welcome to my food truck!')); // Handle GET requests to root, send response
app.listen(3000, () => console.log('Truck’s open at http://localhost:3000')); // Start server on port 3000
How to Explain Code: `require('express')` loads Express, `express()` creates the app, `app.get()` defines a route for the root URL, and `app.listen()` starts the server on port 3000. The diagram shows how a client request reaches the server and gets a response.
Pro Tip: `app.listen` uses Node’s HTTP server, great for handling lots of requests.
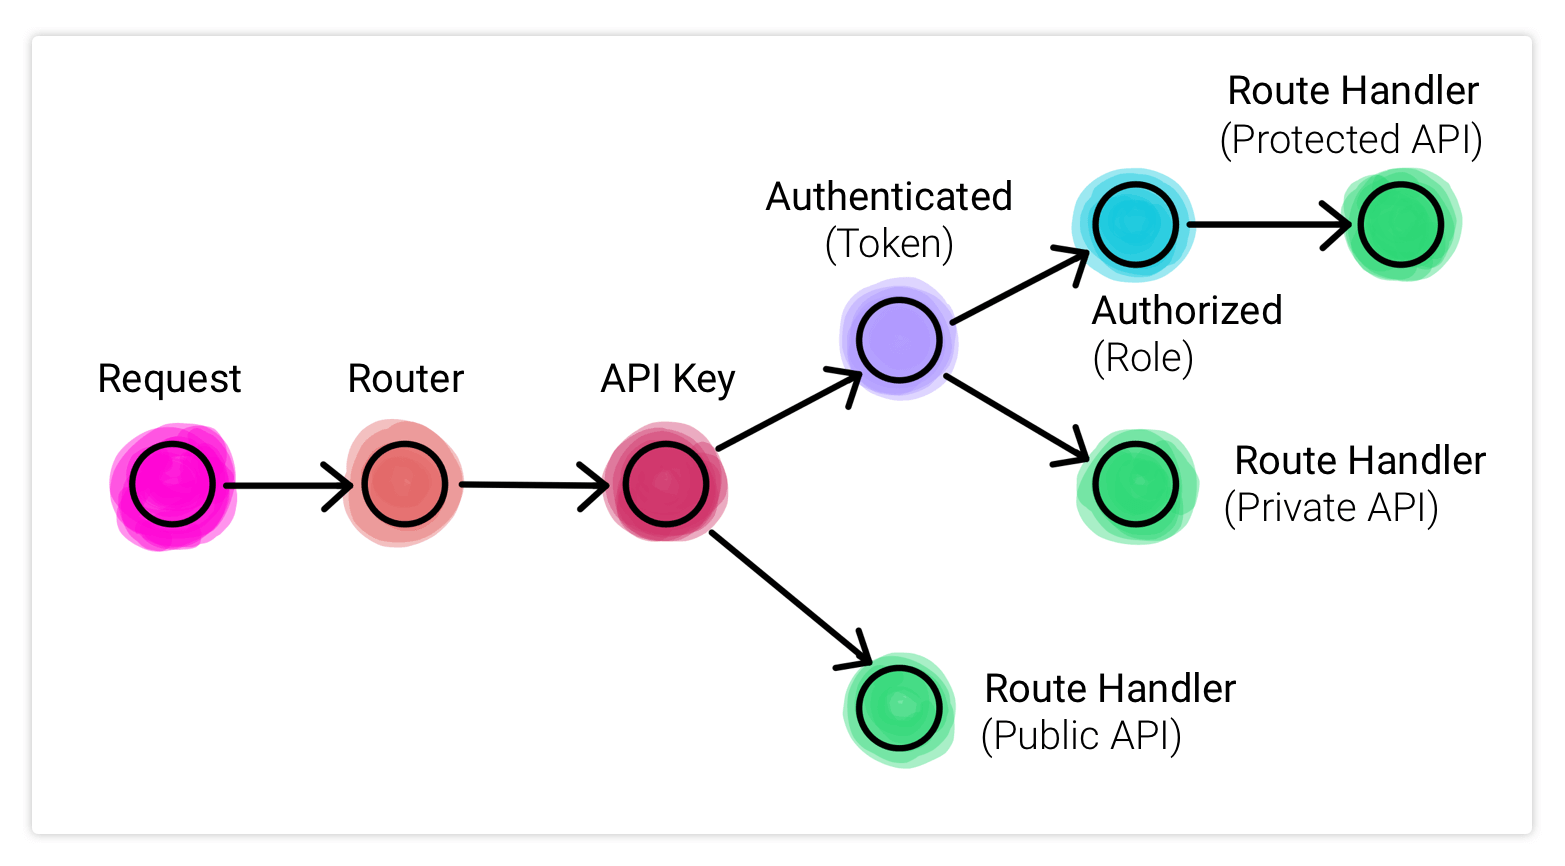
4. What’s routing in Express?
Explanation: Routing is like a GPS for your app—it directs users to the right page based on URL and method (GET, POST). Here’s a routing diagram:

Code Example (if asked):
app.get('/home', (req, res) => res.send('You’re home!')); // Handle GET requests to /home, send response
app.post('/order', (req, res) => res.send('Order placed!')); // Handle POST requests to /order, send response
How to Explain Code: `app.get()` handles read requests for `/home`, sending a response. `app.post()` handles create requests for `/order`. The diagram shows how routes direct requests to controllers.
Pro Tip: Use patterns like `/user/:id` for dynamic URLs. Order specific routes before general ones.
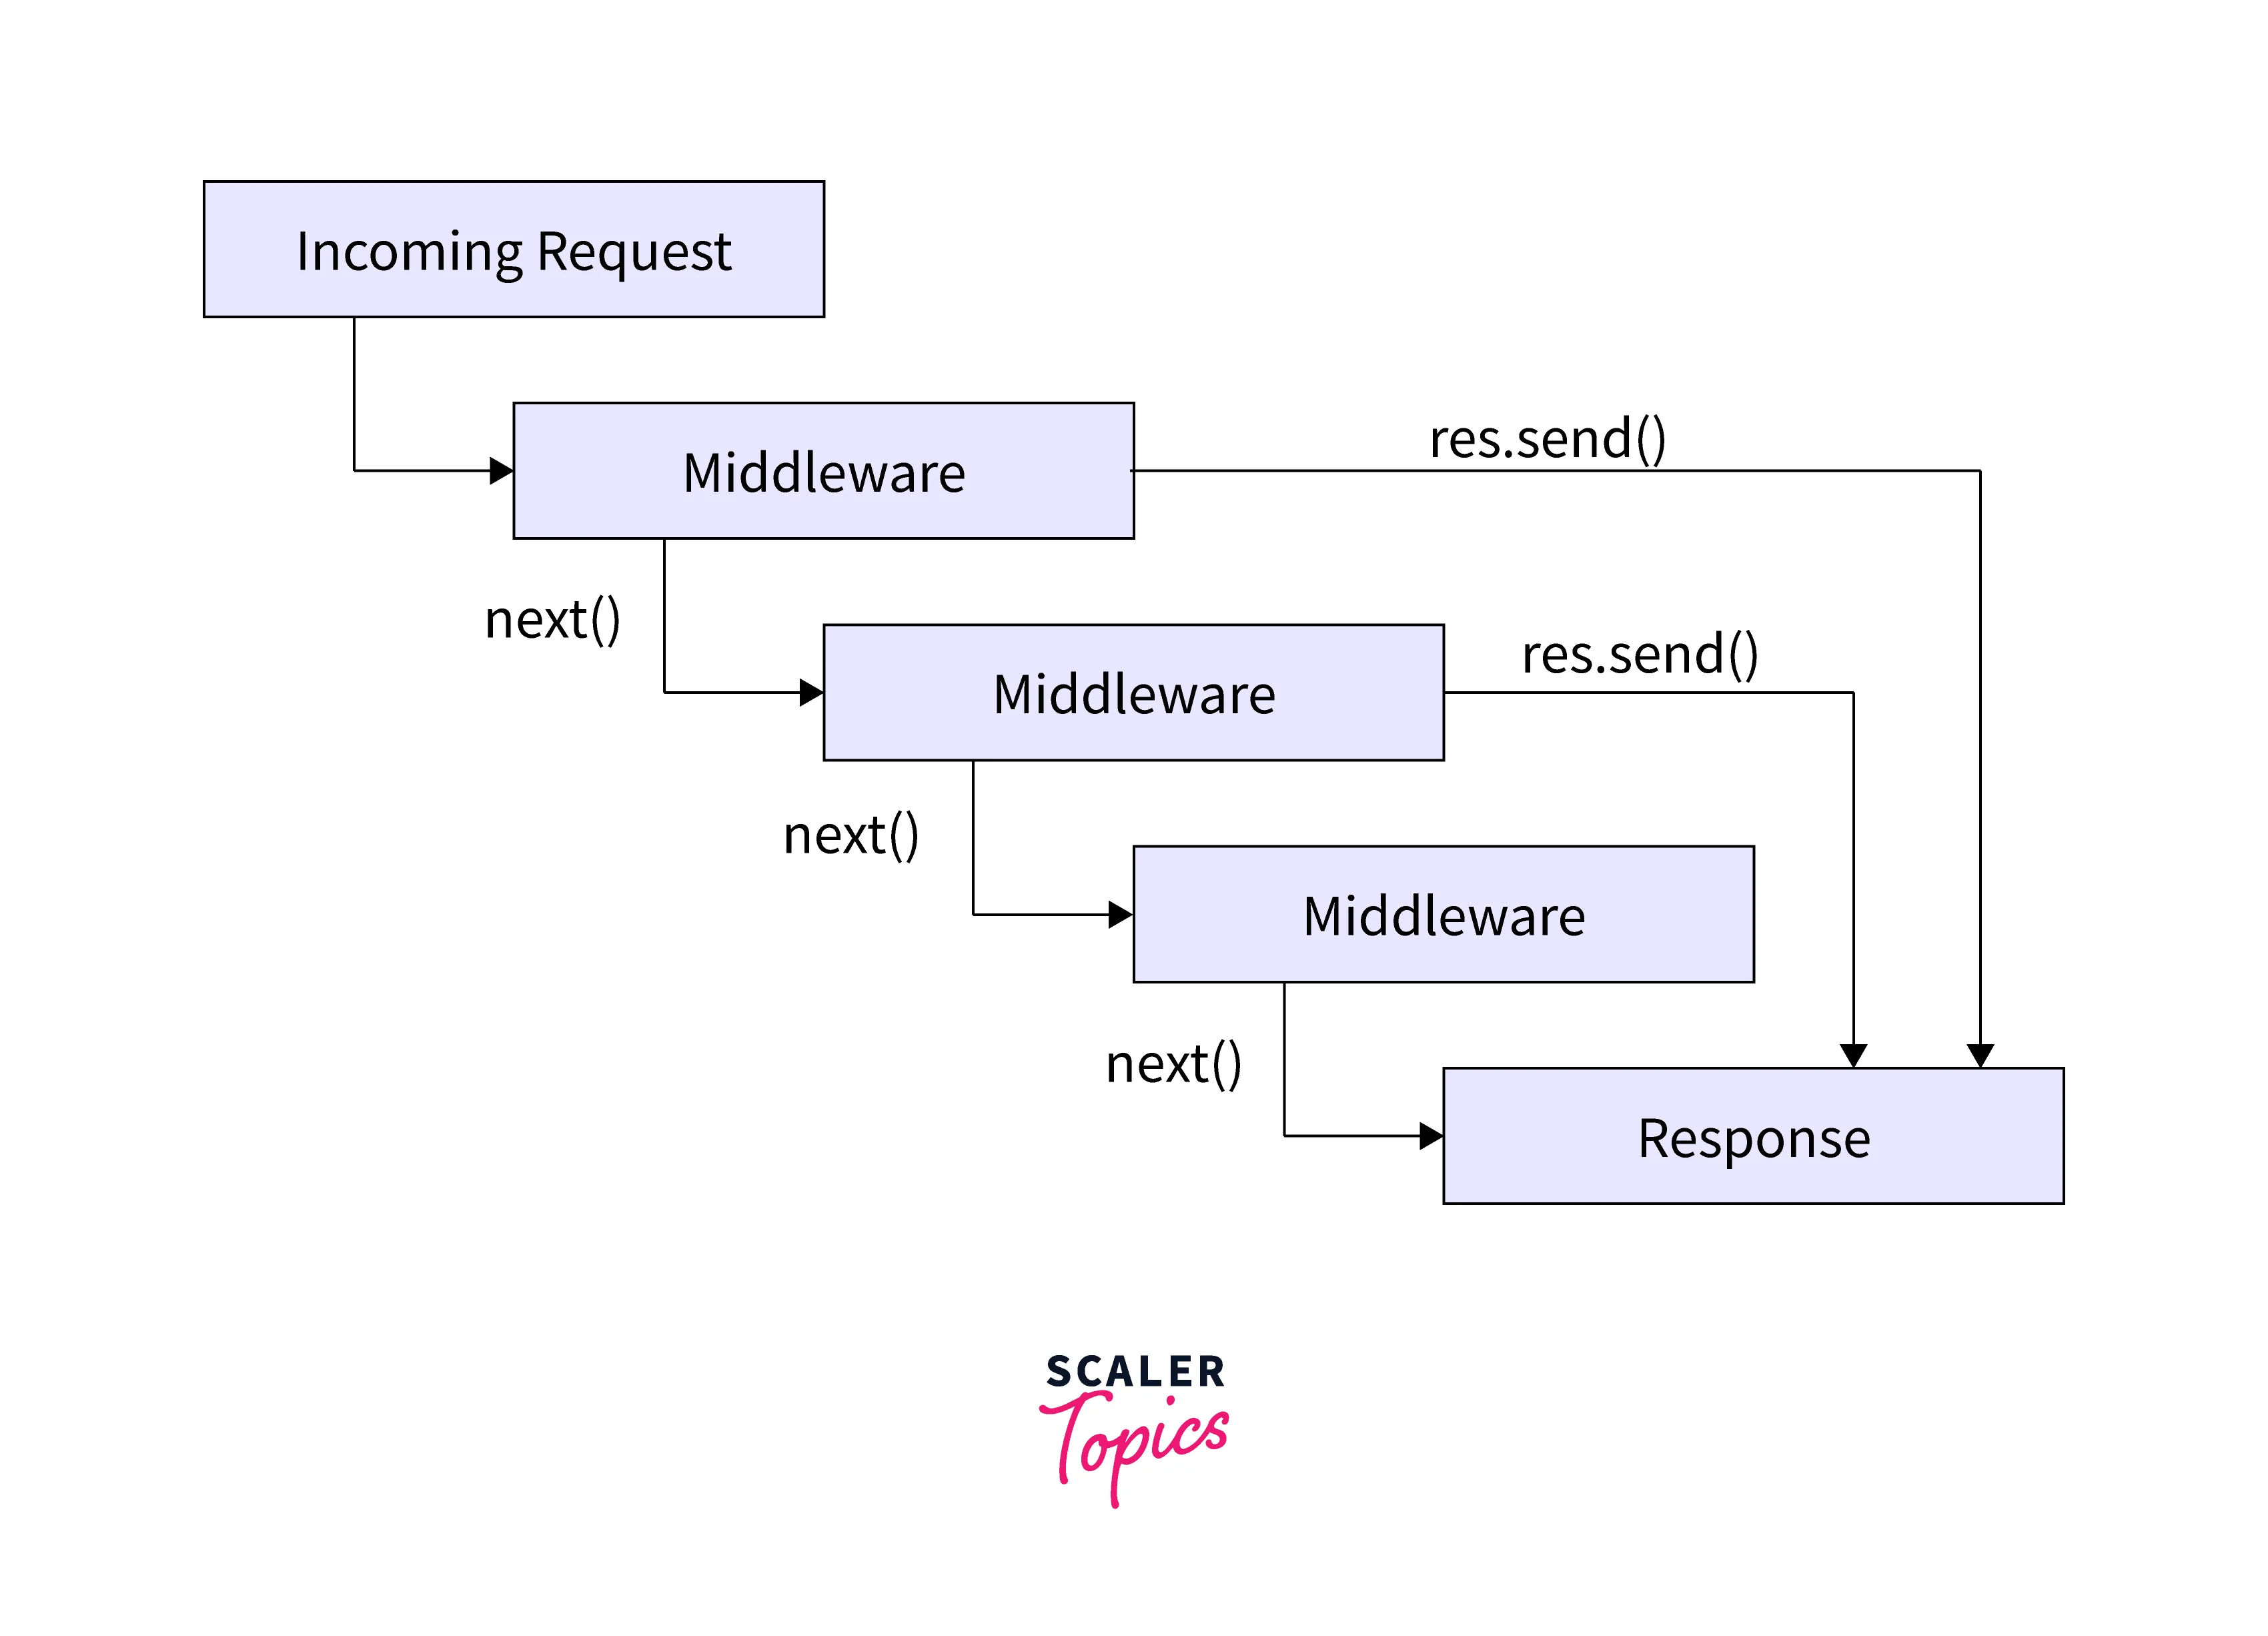
5. What’s Middleware in Express?
🌐 Simple Meaning: Middleware in Express.js is a function that sits between the request and the response. It can check, modify, or log things before passing the request to the next part of the program.
🧠 Easy Example (Real Life): Imagine a security guard at the building gate. Before you enter, the guard checks your ID. In Express, middleware does the same—it checks or processes the request before it goes to the route.
⚙️ How It Works:
- The client (browser) sends a request to the server.
- The middleware receives it first—it can log, authenticate, or modify it.
- After completing its job, it calls
next()to pass control to the next middleware or route. - Finally, the route sends a response back to the client.
🧩 Common Uses of Middleware:
- 🧾 Logging requests
- 🔐 Checking authentication (login)
- 🧰 Validating data
- ⚠️ Handling errors
- 📦 Serving static files
- 🧮 Parsing JSON or form data
🧭 Middleware Chain Diagram:
Middleware works in a chain—each one runs in order until next() is not called or a
response is sent.
💻 Code Example:
const express = require('express');
const app = express();

// Middleware for all requests
app.use((req, res, next) => {
  console.log('Got a request for:', req.url); // Logs every URL
  next(); // Passes control to next handler
});

// Simple route
app.get('/', (req, res) => {
  res.send('Hello, this is the homepage!');
});

app.listen(3000, () => console.log('Server running on port 3000'));
📖 How to Explain This Code:
app.use()— adds a middleware for every request.req— request object (details from client).res— response object (used to send data back).next()— moves to the next middleware or route.- Here, it simply logs the URL and moves on.
📊 Middleware Flow (Step by Step):
- Client sends request →
- Middleware runs →
next()passes to next middleware →- Route handler executes →
- Response sent to client ✅
💡 Pro Tip: Middleware is the backbone of Express. Use small, specific middlewares for logging, validation, and auth. Avoid putting heavy logic in global middleware—it can slow down your app.
🧾 Summary Table:
| Step | Action | Who Does It |
|---|---|---|
| 1 | Request sent | Client (Browser) |
| 2 | Request received & processed | Middleware |
| 3 | Route executes | Express Route |
| 4 | Response sent | Server |
✅ Final Line: Middleware = “Function that works in between request and response” — like a helper that prepares or checks everything before sending the final reply.
6. What does `next()` do in middleware?
Explanation: `next()` passes the request to the next middleware or route, like passing a plate to the next chef.
Code Example (if asked):
app.use((req, res, next) => { // Define middleware
  if (req.query.vip === 'true') next(); // If VIP query is true, proceed to next handler
  else res.send('Sorry, VIPs only!'); // Otherwise, send a response and stop
});
How to Explain Code: The middleware checks for a `vip` query parameter. If true, `next()` passes control; otherwise, it sends a response, halting the chain.
Pro Tip: `next('error')` jumps to error middleware. Use after `await` in async code.
7. How do you serve static files (like images or CSS)?
🌐 Simple Meaning: Static files are files that don’t change — like images, CSS, JavaScript, or HTML files. They are directly sent to the browser as they are.
🧁 Easy Example: Think of static files as ready-to-serve snacks — no cooking (processing) needed. The server just gives them to you when you ask.
⚙️ In Express.js:
Use express.static() to tell Express which folder contains your static files.
💻 Code Example:
const express = require('express');
const app = express();

// Serve all files inside "public" folder
app.use(express.static('public'));

app.listen(3000, () => console.log('Server running on port 3000'));
📖 How to Explain Code:
express.static('public')means: “If someone requests a file, check inside the public folder.”- No need to create routes for images or CSS — Express handles it automatically.
- Example: if there’s a file
public/style.css, you can access it ashttp://localhost:3000/style.css.
🗂️ Folder Structure Example:
project/
│
├── public/
│   ├── style.css
│   ├── script.js
│   └── logo.png
│
└── app.js
💡 Pro Tip: Always use a folder like public for safety and organization. For faster loading, you can also use a CDN (Content Delivery Network) later.
✅ Summary:
- 📦 Static files = fixed files (images, CSS, JS)
- ⚙️ Use
express.static()to serve them - 🪄 No routing needed — they’re auto-accessible
- 🏁 Keep them in a “public” folder for best practice
8. What’s req.params?
🌐 Simple Meaning:
req.params is used to get values from the URL when the URL has dynamic parts.
🧠 Easy Example:
If someone visits /user/123,
Express can capture 123 using req.params.id.
💻 Code Example:
app.get('/user/:id', (req, res) => {
  res.send(`User ID: ${req.params.id}`);
});
📖 How It Works:
:id→ defines a dynamic part of the URL.req.params.id→ reads that dynamic value.- Example:
URL →
/user/45Output → “User ID: 45”
📎 Real-Life Example:
/product/10→ Show product 10/student/5→ Show student with ID 5
💡 Pro Tip:
Always validate or sanitize req.params
before using them — to prevent hackers from sending unsafe data.
✅ Summary:
- 📦
req.params→ holds values from URL. - 🪄 Used when route has dynamic parts like
:id. - ⚙️ Example:
/user/:id→req.params.id - 🔒 Always validate for safety.
9. How do you send JSON in Express?
🌐 Simple Meaning:
To send data from the server to the client in JSON format (used in APIs),
use res.json().
🧠 Easy Example:
JSON (JavaScript Object Notation) is just data in key–value pairs like:
{ "name": "Deepak", "age": 21 }.
💻 Code Example:
app.get('/api/menu', (req, res) => {
  res.json({ dish: 'Pizza', price: 10 });
});
📖 How It Works:
res.json()sends the response as JSON format.- It automatically sets the header
Content-Type: application/json. - This is how most APIs send data to clients or apps.
- Example Response:
{ "dish": "Pizza", "price": 10 }
⚙️ Compare:
res.send()→ sends text, HTML, or data (general use).res.json()→ sends proper JSON + sets correct headers (for APIs).
📡 Real-Life Use:
APIs use res.json() to send data like user info, products, weather, etc.
Example: /api/users → sends list of users as JSON.
💡 Pro Tip: Always send a status code with API responses for clarity:
res.status(200).json({ message: 'Success', data: users });
✅ Summary:
- 📦
res.json()→ sends data as JSON. - 🧩 Used for APIs and data exchange.
- ⚙️ Auto-sets JSON headers.
- 🚀 Better than
res.send()for structured data. - 💬 Add
res.status()for better API responses.
10. What HTTP methods does Express support?
🌐 Simple Meaning: HTTP methods are the types of requests a client (like a browser or app) sends to the server. Express supports all major methods used in REST APIs.
📦 Common Methods in Express:
- GET → Read data (e.g., show users)
- POST → Create new data (e.g., add user)
- PUT → Update entire data (e.g., replace user info)
- PATCH → Update part of data (e.g., change user name only)
- DELETE → Remove data (e.g., delete user)
💻 Code Example:
app.get('/users', (req, res) => res.send('Get all users'));
app.post('/users', (req, res) => res.send('Add new user'));
app.put('/users/:id', (req, res) => res.send('Update full user'));
app.patch('/users/:id', (req, res) => res.send('Update part of user'));
app.delete('/users/:id', (req, res) => res.send('Delete user'));
🧠 Easy Example (Real Life): Think of a restaurant:
- GET → Look at menu 🍽️
- POST → Place a new order 🧾
- PUT → Replace your full order 🍕➡️🥗
- PATCH → Change just one item in the order 🍕➡️🍔
- DELETE → Cancel your order ❌
💡 Pro Tip: These methods form the base of REST APIs. Use correct methods for clarity and proper API design. Also, handle CORS (Cross-Origin Resource Sharing) if requests come from another domain.
✅ Summary:
- ⚙️ Express supports: GET, POST, PUT, PATCH, DELETE
- 🔁 Used to Create, Read, Update, Delete data (CRUD)
- 🧩 Important for REST API design
- 🌍 Handle CORS for external access
11. How do you handle a 404 (page not found)?
🌐 Simple Meaning: A 404 error happens when the client requests a page or route that doesn’t exist. Express can handle this with a catch-all middleware.
⚙️ How It Works:
- Add a middleware at the end of all routes.
- It catches all requests that don’t match existing routes.
- Sets status code to
404and sends a message or JSON.
💻 Code Example:
app.use((req, res) => {
  res.status(404).send('Oops, page not found!');
});
📖 How to Explain:
- This middleware runs only if no other route matches.
res.status(404)sets the HTTP status to 404.res.send()sends a user-friendly message.
💡 Pro Tip:
- For APIs, return JSON instead of text:
res.status(404).json({ error: 'Not found' }) - Log 404 errors to track broken links or analytics.
✅ Summary:
- 🛑 404 = page or route not found
- ⚙️ Use catch-all middleware at the end
- 📝 Send text or JSON to inform the client
- 📊 Logging helps track issues
13. Full Express App Example (Router + Controller + Middleware + Model + DB)
🧠 Simple Meaning: A full Express app is built by separating the code into different parts — like dividing a restaurant into kitchen (controller), menu (routes), manager (middleware), and storage (database).
📁 Folder Structure:
project/
│
├── app.js                 # Main app file
├── routes/
│   └── users.js           # Router for user routes
├── controllers/
│   └── userController.js  # Controller with user logic
├── middleware/
│   └── logger.js          # Custom middleware
├── models/
│   └── User.js            # Mongoose model (MongoDB)
└── .env                   # Database connection config
⚙️ Step 1: Middleware (middleware/logger.js)
module.exports = (req, res, next) => {
  console.log(`[${new Date().toLocaleTimeString()}] ${req.method} ${req.originalUrl}`);
  next();
};
🧩 Step 2: User Model (models/User.js)
const mongoose = require('mongoose');

const userSchema = new mongoose.Schema({
  name: { type: String, required: true },
  email: { type: String, required: true, unique: true },
  age: Number,
}, { timestamps: true });

module.exports = mongoose.model('User', userSchema);
👨🍳 Step 3: Controller (controllers/userController.js)
const User = require('../models/User');

// CRUD operations
exports.getAllUsers = async (req, res) => { /*...*/ };
exports.getUserById = async (req, res) => { /*...*/ };
exports.createUser = async (req, res) => { /*...*/ };
exports.updateUser = async (req, res) => { /*...*/ };
exports.deleteUser = async (req, res) => { /*...*/ };
📌 Step 4: Router (routes/users.js)
Router Meaning:
express.Router() is a “mini-app” that groups related routes together.
You can add middleware to the router or specific routes.
Router Analogy: Main app = restaurant, Router = drinks menu, Router-level middleware = waiter checking all drink orders, Route = individual drink.
const express = require('express');
const router = express.Router();
const userController = require('../controllers/userController');

// Router-level middleware
router.use((req, res, next) => {
  console.log('User Router Middleware Triggered');
  next();
});

// Routes
router.get('/', userController.getAllUsers);
router.get('/:id', userController.getUserById);
router.post('/', userController.createUser);
router.put('/:id', userController.updateUser);
router.patch('/:id', userController.updateUser);
router.delete('/:id', userController.deleteUser);

module.exports = router;
🚀 Step 5: Main App (app.js)
const express = require('express');
const mongoose = require('mongoose');
const dotenv = require('dotenv');
const usersRouter = require('./routes/users');
const logger = require('./middleware/logger');

dotenv.config();
const app = express();

// Global middleware
app.use(express.json());
app.use(logger);

// Mount router
app.use('/users', usersRouter);

// 404 handler
app.use((req, res) => res.status(404).json({ error: 'Route not found' }));

// Connect DB & start server
mongoose.connect(process.env.MONGO_URI)
  .then(() => app.listen(3000, () => console.log('Server running')))
  .catch(err => console.log(err));
🔑 How It Works (Flow):
- 🟢 app.js → main app, global middleware, mounts routers
- 🟠 users router → mini-app grouping all user routes, router-level middleware
- 🔵 controller → handles logic for each route
- 🟣 model → connects to MongoDB database
- 🟤 middleware → logs or validates requests
- ⚫ Catch-all 404 → handles unknown routes
📊 API Endpoints:
| Method | Route | Description |
|---|---|---|
| GET | /users | Get all users |
| GET | /users/:id | Get user by ID |
| POST | /users | Create user |
| PUT | /users/:id | Update user |
| DELETE | /users/:id | Delete user |
💬 Real-Life Analogy:
- 🧾 app.js = Main restaurant manager
- 📋 router = Menu section (e.g., Users menu)
- 👨🍳 controller = Chef preparing each order
- 🧱 model = Storage (database)
- 🕵️♂️ middleware = Waiter/security guard checking requests
💡 Summary:
- ✅ Use
express.Router()to organize routes - ✅ Keep business logic in controllers
- ✅ Use middleware for logging, validation, or security
- ✅ Use Mongoose models to interact with MongoDB
- ✅ Keep app modular, maintainable, and clean
13. How do you add middleware to a specific route?
🧠 Explanation: Middleware can be applied to a single route by placing it before the route handler. It runs only for that route, allowing conditional checks like authentication or logging.
💻 Code Example:
// Middleware function
const checkUser = (req, res, next) => {
  console.log('Checking user...');
  // Example condition
  if(req.query.user === 'admin') next();
  else res.status(403).send('Access denied!');
};

// Apply middleware to specific route
app.get('/secret', checkUser, (req, res) => {
  res.send('Secret menu!');
});
🔍 How to Explain: - `checkUser` runs before the route handler. - `next()` passes control to the handler if conditions pass. - If condition fails, middleware can stop the request and send a response.
Pro Tip: Use route-specific middleware for auth, logging, validation, or other checks. You can chain multiple middleware functions for one route.
14. What are the arguments of middleware functions?
🧠 Explanation:
Middleware functions receive req, res, and next.
- `req` → request info
- `res` → response object
- `next` → function to pass control to next middleware
Error-handling middleware also receives err as the first argument.
Pro Tip: `req` and `res` are mutable, so you can add data (like notes to an order) for later middleware or routes.
15. What’s the difference between app.use() and
app.get()?
🧠 Explanation:
app.use()→ Runs middleware for all HTTP methods and routes (global or path-specific)app.get()→ Handles only GET requests for a specific route
💡 Key Points:
- Use
app.use()for logging, authentication, or JSON parsing - Use
app.get()(orapp.post(),app.put()) for route-specific logic app.use()can take a path to limit its scope, e.g.,app.use('/users', middleware)
Pro Tip: app.use() = global tasks;
app.get() = page/route-specific tasks.
16. How do you handle query parameters?
Explanation: Query parameters are extra info in a URL after a ?, like
?q=book&category=novel. You can access them in Express using req.query.
Code Example:
const express = require('express');
const app = express();
const port = 3000;

app.get('/search', (req, res) => {
    const searchTerm = req.query.q;
    const category = req.query.category;

    res.send(`Searching for: ${searchTerm}, Category: ${category || 'all'}`);
});

app.listen(port, () => {
    console.log(`Server running at http://localhost:${port}`);
});
How to Explain: req.query.q gets the q value from the URL.
Example: /search?q=book → searchTerm = 'book'. Similarly,
req.query.category gets the category.
Pro Tip: Always validate query parameters to prevent security issues.
17. What’s the default port for Express?
Explanation: No strict default, but 3000 is common for dev.
Pro Tip: Use `process.env.PORT` for cloud platforms.
18. How is Node.js different from Express.js?
Explanation: Node.js is a JavaScript runtime that lets you run JS on the server. Express.js is a framework built on top of Node.js that provides tools and shortcuts to make building web applications easier and faster.
Example:
// Node.js alone
const http = require('http');

const server = http.createServer((req, res) => {
    res.write('Hello from Node.js!');
    res.end();
});

server.listen(3000, () => console.log('Server running on port 3000'));

// Using Express.js
const express = require('express');
const app = express();

app.get('/', (req, res) => res.send('Hello from Express.js!'));

app.listen(3000, () => console.log('Server running on port 3000'));
Pro Tip: Express simplifies routing, middleware, and other common tasks, but for very simple apps, plain Node.js might be faster.
19. What are some cool features of Express.js?
Explanation: Express.js has many features that make building web apps easier:
- Routing: Handle different URLs with different code.
- Middleware: Functions that run before your routes to process requests.
- Static Files: Serve images, CSS, JS files easily.
- Template Engines: Use Pug, EJS, or Handlebars to render dynamic HTML.
Pro Tip: Express works seamlessly with async/await and
can integrate easily with databases like MongoDB.
20. What’s a `.env` file for?
Explanation: Stores secrets like API keys. Load with `dotenv`.
Code Example (if asked):
require('dotenv').config(); // Load environment variables from .env file
app.listen(process.env.PORT || 3000); // Start server on PORT from .env or default to 3000
How to Explain Code: `dotenv.config()` loads variables from `.env`. `process.env.PORT` uses the defined port or falls back to 3000.
Pro Tip: Part of 12-factor apps, keeps secrets safe.
21. What are JWTs?
Explanation: JWTs (JSON Web Tokens) are secure tokens used to authenticate and authorize users in web applications. They are stateless, meaning you don’t need to store sessions on the server.
Structure of a JWT:
- Install:
npm install jsonwebtoken - Header: Contains metadata like token type and algorithm (e.g., HMAC SHA256).
- Payload: Contains user data or claims (e.g., userId, role).
- Signature: Encodes the header and payload with a secret key to prevent tampering.
Flow from Backend to Frontend:
- User logs in and provides credentials (username/password).
- Backend verifies credentials and generates a JWT using
jwt.sign(). - Backend sends the JWT to the frontend (usually in the response body or as a cookie).
- Frontend stores the token (in
localStorageorcookies). - Frontend sends the JWT in the
Authorizationheader for protected routes:Authorization: Bearer <token>. - Backend verifies the token using
jwt.verify()before granting access.
Code Example (Backend):
const express = require('express');
const jwt = require('jsonwebtoken');
const app = express();
app.use(express.json());

const SECRET_KEY = 'mysecret';

// Login route
app.post('/login', (req, res) => {
    const { username, password } = req.body;

    // Dummy check (replace with DB check)
    if(username === 'user' && password === 'pass') {
        const token = jwt.sign({ userId: 1, username }, SECRET_KEY, { expiresIn: '1h' });
        return res.json({ token });
    }

    res.status(401).send('Invalid credentials');
});

// Protected route
app.get('/dashboard', (req, res) => {
    const authHeader = req.headers['authorization'];
    const token = authHeader && authHeader.split(' ')[1];

    if(!token) return res.status(401).send('Token missing');

    try {
        const user = jwt.verify(token, SECRET_KEY);
        res.send(`Welcome ${user.username} to your dashboard!`);
    } catch(err) {
        res.status(403).send('Invalid token');
    }
});

app.listen(3000, () => console.log('Server running on port 3000'));
How to Explain Code:
jwt.sign(payload, secret, options)→ Creates a token with user info and expiration.jwt.verify(token, secret)→ Validates the token and extracts user info.- Frontend sends the token in the
Authorizationheader for protected routes.
Pro Tips:
- Always keep your secret key safe.
- Use HTTPS to prevent token theft.
- Set token expiration to reduce risks.
- Use
express-jwtor middleware to protect routes efficiently.
23. How to Use Bcrypt in Login System?
Explanation:
bcrypt is used to securely hash passwords before saving them in the database and to
verify them
during login. It ensures that even if someone gains access to your database, they cannot see users’
real passwords.
Installation:
npm install bcryptStep-by-Step Example:
// Import bcrypt
const bcrypt = require('bcrypt');

// Simulating a database (in real use, this would be MongoDB, MySQL, etc.)
let database = {};

// 🔹 Step 1: Signup (Hash and Store Password)
async function signup(username, password) {
    try {
        // Generate hash with 10 salt rounds
        const hashedPassword = await bcrypt.hash(password, 10);
        database[username] = hashedPassword; // Save hashed password in DB
        console.log(`✅ User ${username} registered with hashed password:`);
        console.log(hashedPassword);
    } catch (err) {
        console.error("Error hashing password:", err);
    }
}

// 🔹 Step 2: Login (Compare Passwords)
async function login(username, enteredPassword) {
    try {
        const storedHash = database[username];
        if (!storedHash) {
            console.log("❌ User not found!");
            return;
        }

        // Compare entered password with stored hash
        const match = await bcrypt.compare(enteredPassword, storedHash);
        if (match) {
            console.log("✅ Login successful! Password matched.");
        } else {
            console.log("❌ Incorrect password!");
        }
    } catch (err) {
        console.error("Error during login:", err);
    }
}

// Example usage
(async () => {
    await signup("deepak", "mySecret123");   // Register user
    await login("deepak", "mySecret123");    // Correct password → ✅
    await login("deepak", "wrongPassword");  // Wrong password → ❌
})();
How It Works:
bcrypt.hash(password, saltRounds)→ Converts plain password into a secure hash using random salt.- Salt ensures every hash is unique, even for the same password.
bcrypt.compare(plain, hash)→ Checks if a user-entered password matches the stored hash.
Login Flow Explained:
- Signup: When the user creates an account, bcrypt hashes their password.
- Store: The hashed password (not the real one) is saved in the database.
- Login: User enters password → bcrypt.compare() checks if it matches the stored hash.
- If matched → ✅ Login successful; else → ❌ Invalid password.
Pro Tip:
Always use asynchronous bcrypt functions (await or callbacks) to avoid blocking your
Node.js server.
23. Why separate the Express app and server?
Explanation:
In Express.js projects, it’s a best practice to separate the core app setup (routes, middleware)
from the server startup (app.listen). This keeps your code modular, testable, and
scalable.
app.js – defines routes and middleware:
const express = require('express');
const app = express();

app.use(express.json()); // Parse JSON bodies
app.get('/', (req, res) => res.send('Hello from Express App!'));

module.exports = app; // Export app for use in server.js
server.js – starts the server:
const app = require('./app');
const PORT = 3000;

app.listen(PORT, () => {
    console.log(`🚀 Server running on http://localhost:${PORT}`);
});
How to Explain Code:
app.jshandles logic (routes, middleware).server.jshandles execution (app.listen).- Separating them makes testing and scaling easier.
Pro Tip:
During testing, you can import app.js directly into a test file
without starting the actual server — this is why separation is so helpful.
24. What’s ESLint?
Explanation:
ESLint is a popular tool used to find and fix problems in your JavaScript code.
It helps you follow consistent coding styles, catch bugs early, and enforce best practices
automatically.
Why Use ESLint?
- Prevents common errors (like missing semicolons or unused variables).
- Ensures consistent code style across your project.
- Improves code readability and maintainability.
- Integrates easily with VS Code and most IDEs for real-time linting.
Installation:
npm install eslint --save-dev
npx eslint --init
Setup Example (.eslintrc.json):
{
    "env": {
        "browser": true,
        "es2021": true,
        "node": true
    },
    "extends": [
        "eslint:recommended"
    ],
    "rules": {
        "semi": ["error", "always"],        // Require semicolons
        "quotes": ["warn", "double"],       // Prefer double quotes
        "no-unused-vars": "warn"            // Warn about unused variables
    }
}
How to Run ESLint:
npx eslint yourFile.js           // Check one file
npx eslint .                     // Check entire project
npx eslint . --fix               // Automatically fix issues
How to Explain Code:
"env"specifies where your code runs (Node.js, browser, etc.)."extends"loads base configurations likeeslint:recommended."rules"defines custom project-specific linting rules.--fixautomatically corrects simple issues like spacing or quotes.
Example Use in Express Project:
// Example: Common ESLint error fixed
// ❌ Before:
const express = require('express')
const app = express()

// ✅ After (following ESLint rules):
const express = require("express");
const app = express();
Pro Tip:
Use eslint-plugin-node for Node.js and Express-specific linting rules.
Example:
npm install eslint-plugin-node --save-dev"plugin:node/recommended" under "extends" in your config.
25. What’s the difference between res.send() and
res.json()?
Explanation: Both methods send responses to the client, but they behave slightly differently:
res.send()→ Sends a response of any type (string, object, buffer, HTML, etc.).res.json()→ Specifically formats and sends a JSON response.
Code Example:
// Example 1: res.send()
app.get('/text', (req, res) => {
    res.send('Hello World!'); // Sends plain text
});

// Example 2: res.json()
app.get('/data', (req, res) => {
    res.json({ message: 'Hello JSON!' }); // Sends JSON object
});
How to Explain Code:
res.send()automatically detects the type of response (HTML, string, etc.).res.json()ensures data is sent in valid JSON format, ideal for APIs.- Internally,
res.json()usesJSON.stringify()before sending the response.
Pro Tip:
Always use res.json() in REST APIs — it automatically sets the
Content-Type: application/json header and avoids common formatting issues.
26. What’s scaffolding in Express?
Explanation:
Scaffolding means automatically generating the folder and file structure of a new Express project
using
express-generator. It helps you quickly start with a ready-made template.
Installation and Usage:
npm install -g express-generator   // Install express-generator globally
express my-cool-app                // Create a new project
cd my-cool-app
npm install                        // Install dependencies
npm start                          // Run the app
Generated Folder Structure:
my-cool-app/
├── app.js
├── bin/
│   └── www
├── routes/
│   ├── index.js
│   └── users.js
├── views/
│   └── index.pug
├── public/
│   ├── images/
│   ├── javascripts/
│   └── stylesheets/
└── package.json
How to Explain Code:
express-generatorcreates a complete Express app structure with routes, views, and public folders.- The
bin/wwwfile is the default server entry point. - Speeds up project initialization and encourages standard structure.
Pro Tip: After scaffolding, customize folders and middlewares based on your project needs instead of starting from scratch.
27. What’s CORS in Express?
Explanation: CORS (Cross-Origin Resource Sharing) is a security mechanism that allows web apps from one domain to access resources from another domain.
Why Use It?
- By default, browsers block requests from different origins for security.
- CORS enables APIs to be shared across domains safely.
Code Example:
const cors = require('cors');
const express = require('express');
const app = express();

app.use(cors({ origin: 'http://mywebsite.com' })); // Allow only specific domain
app.get('/data', (req, res) => {
    res.json({ msg: 'CORS enabled!' });
});

app.listen(3000, () => console.log('Server running...'));
How to Explain Code:
app.use(cors())enables cross-origin access.originspecifies which websites are allowed.- You can also handle preflight requests using
OPTIONSmethod.
Pro Tip:
Avoid using app.use(cors()) with no restrictions in production.
Always whitelist trusted domains for better security.
28. What are built-in middlewares in Express?
Explanation: Express provides several built-in middleware functions to handle common tasks like parsing, serving static files, and reading form data.
Common Built-in Middlewares:
express.json()→ Parses incoming JSON request bodies.express.urlencoded({ extended: true })→ Parses URL-encoded form data.express.static('public')→ Serves static files like CSS, JS, or images.
Code Example:
app.use(express.json()); // For JSON payloads
app.use(express.urlencoded({ extended: true })); // For HTML form data
app.use(express.static('public')); // For static assets
How to Explain Code:
- Each middleware modifies
reqandresbefore reaching the route handler. express.json()replaced the oldbody-parserin Express 4+.- They must be added before your routes to function properly.
Pro Tip: Use only the middlewares you need — too many can slow down requests.
29. How do you set app settings in Express?
Explanation:
Express applications use app.set(name, value) to define configuration settings such as
template engines, view folders, or custom app-level settings.
Code Example:
app.set('view engine', 'pug'); // Use Pug as the template engine
app.set('views', './views');   // Folder path for templates
How to Explain Code:
app.set()defines settings for the Express app.app.get(setting)retrieves the current value of that setting.- Common settings:
view engine,views,trust proxy, etc.
Pro Tip:
You can check all current settings using console.log(app.settings).
30. Which template engines work with Express?
Explanation:
Template engines let you generate dynamic HTML pages using data from the server.
Instead of writing static HTML, you use placeholders like {{name}} or
<%= name %>,
and Express fills them with real data before sending the page to the browser.
Why Use Template Engines?
- Helps create dynamic pages (e.g., profile pages, product listings).
- Keeps HTML separate from backend logic.
- Supports loops, conditionals, and reusability (layouts, partials).
Popular Template Engines:
- Pug → Uses indentation-based syntax, minimal and clean.
- EJS → Uses embedded JavaScript (
<%= %>), looks like regular HTML. - Handlebars (HBS) → Uses
{{}}syntax, great for large-scale apps.
Example 1 — Using Pug:
// app.js
const express = require('express');
const app = express();

app.set('view engine', 'pug'); // Tell Express to use Pug

app.get('/', (req, res) => {
    res.render('index', { title: 'Home', message: 'Welcome to Express!' });
});

app.listen(3000, () => console.log('Server running on http://localhost:3000'));
Pug Template (views/index.pug):
html
  head
    title= title
  body
    h1 #{message}
    p This page is rendered using Pug Template Engine!
How to Explain:
app.set('view engine', 'pug')→ Configures Express to use Pug.res.render('index', {...})→ Loadsviews/index.pugand injects data.- Dynamic values like
titleandmessageare inserted into the HTML before sending to the browser.
Example 2 — Using EJS:
// app.js
app.set('view engine', 'ejs');

app.get('/', (req, res) => {
    res.render('index', { name: 'Deepak' });
});
EJS Template (views/index.ejs):
<h1>Hello <%= name %></h1>
<p>Welcome to EJS Template Engine!</p>
How to Explain:
<%= %>inserts dynamic JavaScript values inside HTML.- EJS looks and feels like normal HTML, making it beginner-friendly.
Example 3 — Using Handlebars (HBS):
const express = require('express');
const { engine } = require('express-handlebars');
const app = express();

app.engine('hbs', engine());
app.set('view engine', 'hbs');

app.get('/', (req, res) => {
    res.render('index', { title: 'HBS Example', name: 'Deepak' });
});
Handlebars Template (views/index.hbs):
<h1>{{title}}</h1>
<p>Hello {{name}}, welcome to Handlebars!</p>
How to Explain:
{{}}syntax is used to bind data values.- Great for large apps — supports partials, layouts, and helpers.
Comparison:
| Engine | Syntax | Best For |
|---|---|---|
| Pug | Indentation-based | Clean and minimal syntax |
| EJS | <%= name %> | Simple HTML-like templates |
| Handlebars | {{name}} | Large apps with reusable parts |
Pro Tip:
- Store templates in a views/ folder.
- Use res.render() to send pages to the client.
- Pug is SEO-friendly, EJS is beginner-friendly, and Handlebars is powerful for complex apps.
31. How do you send plain HTML in Express?
Explanation: Use `res.send()` or `res.sendFile()`.
Code Example (if asked):
app.get('/', (req, res) => res.send('<h1>Hello World!</h1>')); // Send raw HTML response
How to Explain Code: `res.send()` sends an HTML string directly to the client for the root URL.
Pro Tip: Use templates or caching for efficiency.
32. What’s res.cookie() for?
Explanation:
The res.cookie() function in Express is used to
set cookies in the user's browser.
Cookies are small pieces of data stored on the client-side and sent automatically with every HTTP
request.
They’re mainly used for sessions, authentication, tracking, and personalization.
Why Use Cookies?
- To keep users logged in across multiple requests (session management).
- To store small user preferences (e.g., language, theme).
- To track users for analytics or shopping carts.
Basic Code Example:
// Example: Setting a cookie
app.get('/setcookie', (req, res) => {
    res.cookie('username', 'John', { maxAge: 900000, httpOnly: true });
    res.send('Cookie has been set!');
});
How to Explain Code:
'username'→ The name of the cookie.'John'→ The value stored inside the cookie.maxAge: 900000→ The cookie expires after 900,000 ms (15 minutes).httpOnly: true→ Prevents JavaScript access (protection from XSS attacks).
Output:
When you visit http://localhost:3000/setcookie, a cookie named
username=John will appear in your browser’s Application → Cookies section.
Reading Cookies:
const express = require('express');
const cookieParser = require('cookie-parser');
const app = express();

// Middleware to read cookies
app.use(cookieParser());

// Route to read cookies
app.get('/getcookie', (req, res) => {
    const user = req.cookies.username;
    res.send(`Hello ${user}, welcome back!`);
});
How to Explain Code:
cookie-parseris a middleware used to read cookies from the request header.req.cookies.usernameretrieves the cookie set previously.- This allows personalized responses for logged-in users.
Real-World Example (Login Session):
// Step 1: User logs in and cookie is created
app.post('/login', (req, res) => {
    const username = req.body.username;
    // Normally, you'd verify credentials here...
    res.cookie('authUser', username, { httpOnly: true, maxAge: 3600000 }); // 1 hour
    res.json({ message: 'Login successful!' });
});

// Step 2: Protected route - only available if cookie exists
app.get('/dashboard', (req, res) => {
    const user = req.cookies.authUser;
    if (!user) {
        return res.status(401).json({ message: 'Unauthorized. Please log in.' });
    }
    res.send(`Welcome to your dashboard, ${user}!`);
});
How to Explain Code:
- When a user logs in, a cookie named
authUseris created with their username. - The browser stores it and sends it automatically with every new request.
- Protected routes like
/dashboardcan check if this cookie exists to identify the user. - This is a lightweight form of session-based authentication.
Common Cookie Options:
| Option | Description | Example |
|---|---|---|
maxAge |
Cookie lifetime in ms | { maxAge: 3600000 } |
expires |
Exact expiry date | { expires: new Date(Date.now() + 3600000) } |
httpOnly |
Prevents JS access to cookies (security) | { httpOnly: true } |
secure |
Send only over HTTPS | { secure: true } |
sameSite |
Restrict cross-site cookie sending | { sameSite: 'strict' } |
Deleting a Cookie:
// To delete a cookie
res.clearCookie('username');
res.send('Cookie deleted successfully!');
How to Explain Code:
res.clearCookie('cookieName')removes a previously set cookie from the browser.- Useful during logout or session expiry.
Pro Tip:
- Always use httpOnly and secure for sensitive cookies (like auth
tokens).
- Use cookie-parser to easily read cookies from requests.
- Avoid storing sensitive data (like passwords) directly inside cookies.
- Use cookies with JWT or sessions to manage authentication securely.
33. What’s the Pug template engine?
Explanation: Pug writes HTML with indentation.
Code Example (if asked): (app.js)
app.set('view engine', 'pug'); // Set Pug as the template engine
app.get('/', (req, res) => res.render('index', { title: 'My App' })); // Render index.pug with title data
(index.pug):
doctype html // Declare HTML5 document
html
  head
    title= title // Use title variable from render
  body
    h1 Welcome! // Static HTML heading
How to Explain Code: In `app.js`, `app.set()` configures Pug, and `res.render()` renders `index.pug` with data. The `.pug` file uses indentation to define HTML structure.
Pro Tip: Pug’s mixins make reusable HTML easy.
34. How do you handle errors in Express?
Explanation: Use middleware with four arguments (`err, req, res, next`). Here’s an error handling flowchart:

Code Example (if asked):
app.use((err, req, res, next) => { // Error middleware with four parameters
  console.error(err); // Log the error for debugging
  res.status(500).send('Something broke!'); // Send 500 status and error message
});
How to Explain Code: This middleware catches errors, logs them, and sends a 500 response. The diagram shows how errors flow from routes to this handler.
Pro Tip: Log with Winston, return user-friendly messages.
35. How do you parse JSON data from requests?
Explanation: Use `express.json()` for POST JSON data.
Code Example (if asked):
app.use(express.json()); // Parse incoming JSON requests
app.post('/data', (req, res) => res.send(`Got: ${req.body.name}`)); // Handle POST, access JSON body
How to Explain Code: `express.json()` parses JSON payloads into `req.body`. The POST route accesses `name` from the body and responds.
Pro Tip: Set size limit (`{ limit: '1mb' }`) for safety.
36. What’s the difference between `req.params`, `req.query`, and `req.body`?
Explanation:
- `req.params`: From URL paths (e.g., `/user/123` → `req.params.id`).
- `req.query`: From queries (e.g., `?name=John` → `req.query.name`).
- `req.body`: From POST/PUT data.
Pro Tip: Use `params` for IDs, `query` for filters, `body` for payloads. Secure `body` with HTTPS.
37. How do you add authentication in Express?
Explanation: Use middleware like Passport.js or JWT for login checks.
Code Example (if asked):
const jwt = require('express-jwt'); // Import express-jwt for JWT validation
app.use('/secure', jwt({ secret: 'mykey', algorithms: ['HS256'] })); // Protect /secure routes with JWT
How to Explain Code: `express-jwt` middleware checks for a valid JWT in request headers, protecting `/secure` routes.
Pro Tip: Combine JWT with bcrypt, rate-limit attacks.
38. What’s Helmet in Express?
Explanation:
Helmet is a security middleware for Express that automatically adds
important HTTP security headers to protect your app from
common attacks like XSS, clickjacking, and MIME-type sniffing.
Why Use Helmet?
- Protects against Cross-Site Scripting (XSS) attacks.
- Prevents Clickjacking by controlling iframes.
- Forces secure connections via HTTPS headers.
- Hides sensitive implementation details in responses.
Basic Code Example:
const express = require('express');
const helmet = require('helmet');
const app = express();

app.use(helmet()); // Apply Helmet globally

app.get('/', (req, res) => {
  res.send('Secure Express App using Helmet 🛡️');
});

app.listen(3000, () => console.log('Server running on http://localhost:3000'));
How to Explain Code:
helmet()adds multiple security headers to all HTTP responses.- Protects users by enforcing security policies in browsers.
- Helps avoid vulnerabilities like XSS and data leakage.
Real-World Example:
// Example: Secure Banking App
const express = require('express');
const helmet = require('helmet');
const app = express();

app.use(helmet()); // Secure all endpoints

app.get('/dashboard', (req, res) => {
  res.send('Welcome to your secure dashboard 🏦');
});

app.listen(3000, () => console.log('Banking app secured with Helmet!'));
Pro Tip:
Always use helmet() in production.
You can disable specific protections if needed, but never skip it entirely.
Combine Helmet with cors() and express-rate-limit for complete API
security.
39. How do you use environment variables in Express?
Explanation: Store settings in `.env`, load with `dotenv`.
Code Example (if asked):
require('dotenv').config(); // Load environment variables from .env file
const dbUrl = process.env.DB_URL; // Access DB_URL from environment
How to Explain Code: `dotenv.config()` loads `.env` variables, and `process.env.DB_URL` accesses the database URL securely.
Pro Tip: Part of 12-factor apps, keeps secrets safe.
40. What’s Morgan in Express?
Explanation:
Morgan is a popular logging middleware for Express that automatically
logs details about each HTTP request, such as the method, URL, status code,
and response time. It’s extremely useful for debugging and monitoring.
Why Use Morgan?
- Tracks every request coming into your server.
- Helps debug routes, status codes, and response times.
- Useful for monitoring traffic and detecting slow endpoints.
- Can log data to console or save into a file for later analysis.
Basic Code Example:
const express = require('express');
const morgan = require('morgan');
const app = express();

app.use(morgan('tiny')); // Log requests in 'tiny' format

app.get('/', (req, res) => {
  res.send('Morgan is logging your requests!');
});

app.listen(3000, () => console.log('Server running on http://localhost:3000'));
Example Output (Terminal):
GET / 200 3.456 ms - 32
How to Explain Code:
morgan('tiny')prints basic info: method, URL, status, time.- Automatically logs every request that hits the server.
- Helps quickly detect issues while developing.
Common Formats:
| Format | Description |
|---|---|
tiny |
Minimal logs — best for quick debugging |
dev |
Color-coded logs with method, status, and time |
combined |
Full Apache-style logs — best for production |
common |
Standard log without response time |
short |
Compact log format with essential details |
Real-World Example (Production Logging):
const fs = require('fs');
const path = require('path');
const express = require('express');
const morgan = require('morgan');
const app = express();

// Write logs to a file
const accessLogStream = fs.createWriteStream(
  path.join(__dirname, 'access.log'),
  { flags: 'a' }
);

// Use 'combined' format for detailed production logs
app.use(morgan('combined', { stream: accessLogStream }));

app.get('/user', (req, res) => {
  res.json({ user: 'Deepak', role: 'Admin' });
});

app.listen(3000, () => console.log('Morgan logging to access.log file'));
How to Explain Code:
fs.createWriteStream()creates a log file to store access logs.morgan('combined')logs detailed request info for production.- Helps monitor API usage and performance issues over time.
Pro Tip:
- Use 'dev' or 'tiny' in development for readable output.
- Use 'combined' in production to record logs in files.
- Combine with Winston for advanced log management (error levels, timestamps, etc.).
MongoDB Integration with Express.js
Added 5 questions on MongoDB for deeper understanding.
41. How do you connect MongoDB to Express.js?
Explanation:
Express can connect to MongoDB using mongoose, a powerful ODM library.
The connection acts as a bridge between your Express server (backend) and
the MongoDB database, allowing you to store and fetch data easily.
Connection Flow Diagram (explained):
Express.js → Mongoose → MongoDB Database.
Express handles routes → Mongoose handles data logic → MongoDB stores it.
Code Example (Database Connection File):
// 📁 db.js
require('dotenv').config(); // Load .env variables
const mongoose = require('mongoose'); // Import Mongoose

const connectDB = async () => {
  try {
    await mongoose.connect(process.env.MONGO_URI, {
      useNewUrlParser: true,
      useUnifiedTopology: true,
    });
    console.log('✅ Connected to MongoDB successfully');
  } catch (err) {
    console.error('❌ MongoDB connection error:', err.message);
    process.exit(1); // Exit process if connection fails
  }
};

module.exports = connectDB; // Export connection function
How to Use This in index.js:
// 📁 index.js
const express = require('express');
const connectDB = require('./db'); // Import the DB connection function
const app = express();
require('dotenv').config();

// Middleware
app.use(express.json());

// Connect to MongoDB
connectDB(); // Call the database connection

// Test route
app.get('/', (req, res) => {
  res.send('Server and MongoDB connection are working ✅');
});

// Start server
const PORT = process.env.PORT || 3000;
app.listen(PORT, () => console.log(`🚀 Server running on http://localhost:${PORT}`));
Project Structure Example:
📂 Backend/
├── 📁 models/
│   └── User.js
├── 📁 routes/
│   └── userRoutes.js
├── db.js
├── index.js
├── .env
└── package.json
How to Explain Code:
db.jshandles all database logic — keepsindex.jsclean.connectDB()is imported and executed once when the server starts.- If MongoDB is not running or URI is wrong,
process.exit(1)stops the server safely. - Ensures modular and maintainable code for production-level apps.
Example .env file:
MONGO_URI=mongodb://127.0.0.1:27017/myExpressDB
PORT=3000
Expected Output (Terminal):
✅ Connected to MongoDB successfully
🚀 Server running on http://localhost:3000
Pro Tip:
✅ Keep database logic in a separate file (like db.js).
✅ Use dotenv for environment management.
✅ Always handle connection errors with try-catch.
✅ For cloud deployment, replace local Mongo URI with MongoDB Atlas URI.
42. What is Mongoose?
Explanation:
Mongoose is an ODM (Object Data Modeling) library for MongoDB and
Node.js.
It lets you define schemas and models to structure your NoSQL data, giving MongoDB a schema-like
behavior.
Why Use Mongoose?
- Provides structure (schemas) to unstructured MongoDB documents.
- Offers built-in validation and data type enforcement.
- Supports relationships between collections using
refandpopulate(). - Makes CRUD operations simpler and consistent.
Example:
const mongoose = require('mongoose');

const userSchema = new mongoose.Schema({
  name: String,
  email: { type: String, required: true, unique: true },
  age: Number,
});

const User = mongoose.model('User', userSchema);
module.exports = User;
How to Explain Code:
Schemadefines the structure of a document (like a blueprint).Modelgives you methods likefind(),save(),update().- Mongoose converts your JavaScript objects into MongoDB documents automatically.
Pro Tip: Mongoose = Schema + Model + Validation. Think of it as the “translator” between your JavaScript app and the MongoDB database.
43. How to define a schema in Mongoose?
Explanation: A schema in Mongoose defines the shape and data types of your MongoDB documents. It acts like a blueprint for a collection, ensuring that all documents follow a specific format.
Example Schema:
const mongoose = require('mongoose');

const userSchema = new mongoose.Schema({
  name: { type: String, required: true },   // Required string
  email: { type: String, required: true, unique: true }, // Unique email
  age: { type: Number, min: 0 },            // Number with validation
  createdAt: { type: Date, default: Date.now }, // Default date
});

const User = mongoose.model('User', userSchema);
How to Explain Code:
mongoose.Schema()defines fields and their types.mongoose.model()turns schema into a model for performing database operations.- Validation rules (e.g.,
required,min,unique) ensure data integrity.
Pro Tip:
Add timestamps ({ timestamps: true }) to automatically track creation and update times.
44. How to perform CRUD operations with Mongoose in Express?
Explanation: CRUD stands for Create, Read, Update, Delete. Mongoose provides easy methods to perform these operations on MongoDB collections.
Code Example (All CRUD):
const express = require('express');
const User = require('./models/User'); // Import Mongoose model
const app = express();
app.use(express.json());

// CREATE
app.post('/users', async (req, res) => {
  try {
    const user = new User(req.body);
    await user.save();
    res.status(201).send(user);
  } catch (err) {
    res.status(400).send(err);
  }
});

// READ
app.get('/users', async (req, res) => {
  const users = await User.find();
  res.send(users);
});

// UPDATE
app.put('/users/:id', async (req, res) => {
  const updated = await User.findByIdAndUpdate(req.params.id, req.body, { new: true });
  res.send(updated);
});

// DELETE
app.delete('/users/:id', async (req, res) => {
  await User.findByIdAndDelete(req.params.id);
  res.send({ message: 'User deleted successfully' });
});
How to Explain Code:
User.save()creates a new document.User.find()retrieves all documents.User.findByIdAndUpdate()modifies a document by ID.User.findByIdAndDelete()removes a document by ID.
Pro Tip:
Always wrap CRUD logic in try-catch to handle async errors.
Use populate() for referencing related data.
45. How to handle MongoDB errors in Express?
Explanation: MongoDB errors can occur due to validation issues, duplicate keys, or failed connections. In Express, we use error-handling middleware or try-catch blocks to manage these errors gracefully.
Example:
app.post('/users', async (req, res, next) => {
  try {
    const user = new User(req.body);
    await user.save();
    res.send(user);
  } catch (err) {
    next(err); // Pass error to error middleware
  }
});

// Centralized Error Middleware
app.use((err, req, res, next) => {
  console.error('Error:', err.message);

  if (err.code === 11000) { // Duplicate key error
    return res.status(400).json({ message: 'Email already exists!' });
  }

  res.status(500).json({ message: 'Server error', error: err.message });
});
How to Explain Code:
- The
try-catchblock handles async operation errors. next(err)passes the error to a centralized error handler.- Different error codes (like 11000) represent specific MongoDB issues.
Pro Tip:
Log all MongoDB errors using Winston or Morgan for better debugging.
Always sanitize and validate incoming data to prevent malformed documents.
How to Impress in Your Interview
- Use analogies and diagrams: Explain how Express is the waiter, Mongoose is the translator, and MongoDB is the kitchen storing data.
- Handle code questions: Write CRUD routes confidently and describe what each function does.
- Show practical knowledge: Mention using Helmet, dotenv, error handling, and logging tools.
- Highlight security: Use HTTPS, JWT, Helmet, and input validation.
- Performance tips: Use async/await, caching, indexes in MongoDB, and pagination for large datasets.
- Keep it simple: Explain like you’re teaching a friend.
- Ask smart questions: “How does your team handle DB errors or schema design?”
With these notes, examples, and structured explanations, you’ll confidently explain how Express and MongoDB work together using Mongoose — from connection to CRUD to error handling. 🚀